Monday, September 28, 2009

Hammock at Dusk


Now that fall is officially here, the days are getting shorter. Due to this seasonal transition, I bought a lantern and a shepherds hook to illuminate the hammock at night.

The lantern not only gives you a soft light while snuggling in the hammock, but it also illuminates the path back to the house, which gets very dark once the sun goes down.

The beautiful Pinecone Hill floral throw pillow (something I had been pining after for months) came from Farmhouse Wares. Isn't it charming? I love it.

Saturday, September 19, 2009

Downstairs Bathroom Revisited


The new after. New additions include toile shower curtains from Pottery Barn, which happen to match our existing paint perfectly. Thanks to Joan for her input on this!


We also installed Horizon Shutters after finally fixing the trim on the Marvin replacement window.


A simple detail but one that I love, love, love...our new porcelain cross handles. I came across these about a year ago (they're reproductions) and realized that they would fit our existing faucet (also a reproduction). Switching them out was easy - I discovered this by watching hubby do it.


This is the original paint color we used during the first remodel and I still love it.


I was considering a salon wall here but since I'm currently working on a salon wall in our den, I didn't have enough pictures for it. What do you think? Add a salon wall or leave it?


I spruced up some of my Grandmother's old picture frames with some botanical prints from one of my salvage books. It's amazing how many things of hers - things I grew up with - have found a place in our home!


Did I mention how much I love the new porcelain cross handles? And the vase is another piece from my Grandmother. xo

You can go here to see the original remodel.


This is how we found this bathroom when we bought the house three years ago. Like the kitchen, we never used it before we gutted it. This was attributed to some plumbing issues and the fact that we couldn't wait to cleanse it of the 1970's grooviness.

After we gutted it, we updated plumbing & electrical, added insulation, new drywall, crown and base moldings and replaced the fixtures (claw foot bathtub, sink and toilet). The only thing we recycled from the original bathroom was the medicine cabinet. Tub, sink and toilet got hauled off to the Rebuild It Center in town.
Thursday, September 10, 2009

Looking Back


Our kitchen now.


Our kitchen then.

After switching templates, I had to go back and fix each photograph on my blog. This resulted in returning to those early days of the remodel. When I came across this old 'before' photo, I was reminded of how far we've come.

After having remodeled every stitch of this farmhouse, we're finally at the stage where we've been updating some of our original updates! It's exciting because now all the basics like electrical & plumbing, drywall and baseboards are done - it's such a luxury!
I'm finding that I have the energy and patience to really think about the small aesthetic details I felt too rushed and overwhelmed to contemplate during the early remodel. I'm reveling in these aesthetic details as I update our downstairs bathroom right now - photos to soon follow!

Monday, September 7, 2009

Menagerie of Aprons


I have an apron for every occasion. I happened across my apron collection the other day while Hubby was working from home.

The conversation we had five minutes before went something like this...

"I have to work for a few more hours," he said.
"I promise I won't interrupt," I replied.

Less than five minutes later.
"IJUSTFOUNDMYAPRONSLET'SDOAPHOTOSHOOT!"

His face said no but he indulged me anyway. Here's a few of my favorites...


This red floral is like a dress - perfect for a summer BBQ.


This one screams, "bake a cake!"


Who says I don't dress up for Halloween?


My Grandmother's old Thanksgiving apron.


This classic white apron, a favorite (stains and all), makes everything you cook taste better. It gives you the idea that somewhere along the line, you went to cooking school. I wear this a lot for hubby's sake. Note: wasp on shoulder!

Thursday, September 3, 2009

Outdoor Dining Patio


If you would have told me how long it would take to put in our outdoor dining patio, I wouldn't have believed you. I simply had no idea of the time involved in completing such a project. Like the fence, it took many, many hours (and many, many weekends) of meticulous consideration and hard work.

Hubby did most of this work. He did all the math, the measuring, leveling and planning.
See Exhibit A.

Exhibit A.
As for myself, I was good at pointing around and saying, "like this, and there!" 
Which hubby was able to translate into a beautiful patio and stairs.

Although it was our intention to have this completed before summer officially began, 
it has now been completed before summer is officially over!

So the following photos are what it took to create this new space of ours...

This is what we started with after the dining room addition was built. 


Retaining wall was built first. See urns? I'm already starting to decorate.


After a significant amount of gravel was added and leveled, Hubby built a frame for the patio stairs. We decided that the easiest way to build the stairs was to adhere pavers to a strong foundation of concrete. 

This was the night before the concrete truck came to pour the concrete into the stair frame.


The concrete pourer was able to help with leveling the concrete as it was being poured. 


After concrete cured, pavers were adhered.


Next step was to lay the patio floor pavers. 


To make sure that the pavers looked right (as much like real stone as possible), Hubby worked out a pattern on paper first. The pavers were the same width but came in four different lengths so there was a system in place to ensure that all seams were staggered. 

There are a lot more photos. Most of them are of hubby up to his ears in gravel, dirt and pavers. And a few with him giving me the stink eye when I interrupted him with, "stop, let me take your picture!" This request was usually met with deaf ears.


Here's hubby ignoring me after such a request. 

This photo shows the completed patio before we planted the boxwood hedge and limelight hydrangea. 

This photo shows the beginning stages of planting a hedge of boxwood around patio to create a living wall. We wanted the patio to be as green as possible so we opted for a living wall rather than concrete/stone. 

Later on, we decided to add stairs down the center. 

AFTER


PHOTO UPDATES: New patio table and chairs. Full post here


Wednesday, September 2, 2009

A Secret Barn


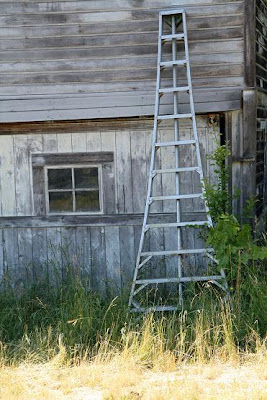
I took the long way into town this morning. I set off by driving down our dirt road and into the valley we look out upon. Winding through hills, past farms and pastures, I came upon this sweet old barn.

I love how the barn sits tucked away behind the orchard. It makes the barn all the more alluring.

After walking under the canopy of green to the end of the orchard row, I reached the barn. Standing there under the bright morning sun, I suddenly felt like I was someplace I shouldn't be - perhaps because, ahem, I was trespassing. So I didn't stay long.


Walking back to my car, my flip flops crunched through the dry summer grass while my head swirled with the magic of the barn. It made me feel like a kid again, having just discovered a secret new hide-out.

P.S. I've updated my blog template (hope you like it!). There have been a few kinks to sort out which have kept me busy but nevertheless, I'm excited about the new layout!
Related Posts Plugin for WordPress, Blogger...